Learn the Usage of New-MailboxExportRequest Exchange 2010


There are multiple scenarios where the Exchange admin looks for a solution to export Exchange 2010 mailboxes to PST. One of the most common reasons is the backup of the server data in PST file format to keep the data safe and secure for future purposes. Besides all this, there are few rare conditions where one needs to export mailboxes from Exchange 2010 to Microsoft Outlook PST file.
This blog will help users to Exchange mailbox files in their desired file format with the help of New-mailboxexportrequest Exchange 2010. Read the article and know about this PowerShell command that helps you to export EDB mailboxes to PST file.
About New-MailboxExportRequest PowerShell Command
This command is first introduced in Exchange 2010 sp1 (Service Pack 1). Microsoft Exchange server 2010 administrator is provided with a command to export mailboxes or archived data to PST file. The name of this cmdlet is new-mailboxexportrequest, which establishes a request to perform the migration. Each request will be having an identical name and the maximum mailboxes limit for data exporting is 10. Users can create only one request at a time.
Here, there is no need of having an Exchange Management console to export Exchange 2010 mailboxes to PST. Only the availability of MS Exchange Management Shell is mandatory for running New-mailboxexportrequest Exchange 2010.
The server users of Exchange 2010 are equipped with a bundle of PowerShell commands. These are used when one has to perform import or export operations on the server. Well, the PowerShell scripts are very much helpful and powerful but, unfortunately not supported on 64-bit systems.
Note: If an Exchange server file gets corrupted, disconnected, and dismounted then, one can also rely on the Most Trusted EDB to PST Converter. It is so because it is an independent solution that easily extract mailbox from offline EDB file of Exchange 2010 and any version and export directly to PST file in a single shot. This utility support both dismounted/offlined Exchange database file and it provides Quick & Advance scan which resolves Exchange mailbox corruption and smartly repair pub1 .edb & priv1 .edb file automatically without using any command. After recovery, users can export the recovered & healthy mailboxes to the Outlook data file in a simplified manner.
Ways to use New-MailboxExportRequest Exchange 2010
The procedure involves 4 major steps to be performed at the administrative level for a successful migration.
Step-1. Permit all the Important Permissions and Roles
The very first step to exhibit migration is that you have to grant permissions to users for performing the export operation. This assigning activity is to be accomplished manually because by default, no accounts are having rights for the same. So, execute the following command in EMS :
New-ManagementRoleAssignment –Role “Mailbox Import Export” –MyUser Administrator
The command having ‘MyUser’ parameter is the username. After successful execution of this cmdlet, restart EMS session for accessing the required permissions.
Step-2. Develop Network Share to Store Output Files
It is possible that there are several client access server environment within a network. Any of them might process for the request to export mailboxes. Therefore, you need to validate the location of the targeted Outlook PST file. This defined path must be UNC, not the local one. In this situation, the suitable way is to generate a new network with the shared folder. Also, grant this folder with all read/write permissions.

Step-3. Begin Procedure to Use New-MailboxExportRequest
Once you have configured all the suggested things properly then, execute PowerShell commands. These cmdlets will be the one that are basically to transfer Exchange 2010 mailboxes to PST.
1. Export primary user mailbox to PST with following New-MailboxExportRequest Exchange 2010 command :
![]()
The parameter <pstfilePath> will describe folder where the server will be saving Outlook file data. This will not be creating the new directory. Instead, it will verify that the defined path is existing. It is so because if you mention an invalid path then, the procedure might gets failed.
2. Transfer particular items from mailbox to PST through the following cmdlets :
![]()
3. Use following command line to export personal Exchange archive to PST :
![]()
4. Type and execute following cmdlet to export a particular mailbox folder to Outlook :
![]()
While executing New-mailboxexportrequest Exchange 2010, mention the mailbox folder, which you want to transfer in Outlook. Describe the folder with ‘#’ symbol that you want to transfer in the opening and closing part. For instance: You want to export Inbox folder only then, write ‘#Inbox#’ in the command.
Step-4. Final Time To Monitor and Clean up Mailboxes
This is the final step in which export procedure needs to be cleared. Execute following command to track status of entire active export activities :
![]()
Now it is the time to remove all the permissions that were assigned in beginning of the migration procedure :
![]()
Use following commands to close the request of exporting mailboxes :
![]()
Alternative Method to Get Mailboxes of Exchange in Desired File Format
There are most users who are new to Microsoft Exchange Server environment and for them it is unable to understand the manual solution because it requires in-depth knowledge, technical skills, and hands-on experience to export Exchange Server mailboxes. So, to avoid the technicality & complexity of thi method users can use the advanced Exchange Export Tool which is capable to providing expected outcomes from Live Exchange Server 2016/2013/2010/2007/2003 in a simplified manner without using any command.
Users can export various mailboxes such as: disconnected, enabled, disabled, exclude dumpster, journal, corrupt, hosted and data items like – mails, calendars, noted, tasks, journals, contacts in a simplified way without any hindrance. You can easily use this advance software to simply export Exchange mailboxes to PST file format as it provides graphical interface which makes the users work easier.
This utility automatically detects, scan and load the active directory and it provides option i.e. include sub-domain user’s which allow users to search the Exchange mailboxes within sub-domain. The data file option of this software export the EDB mailbox data items within the specified date range. It is important to have an Exchange Server environment on the migration machine.
Working Steps to Export Exchange Database Mailbox to Outlook PST File
Step-1. Download and Run the Tool in your local system.
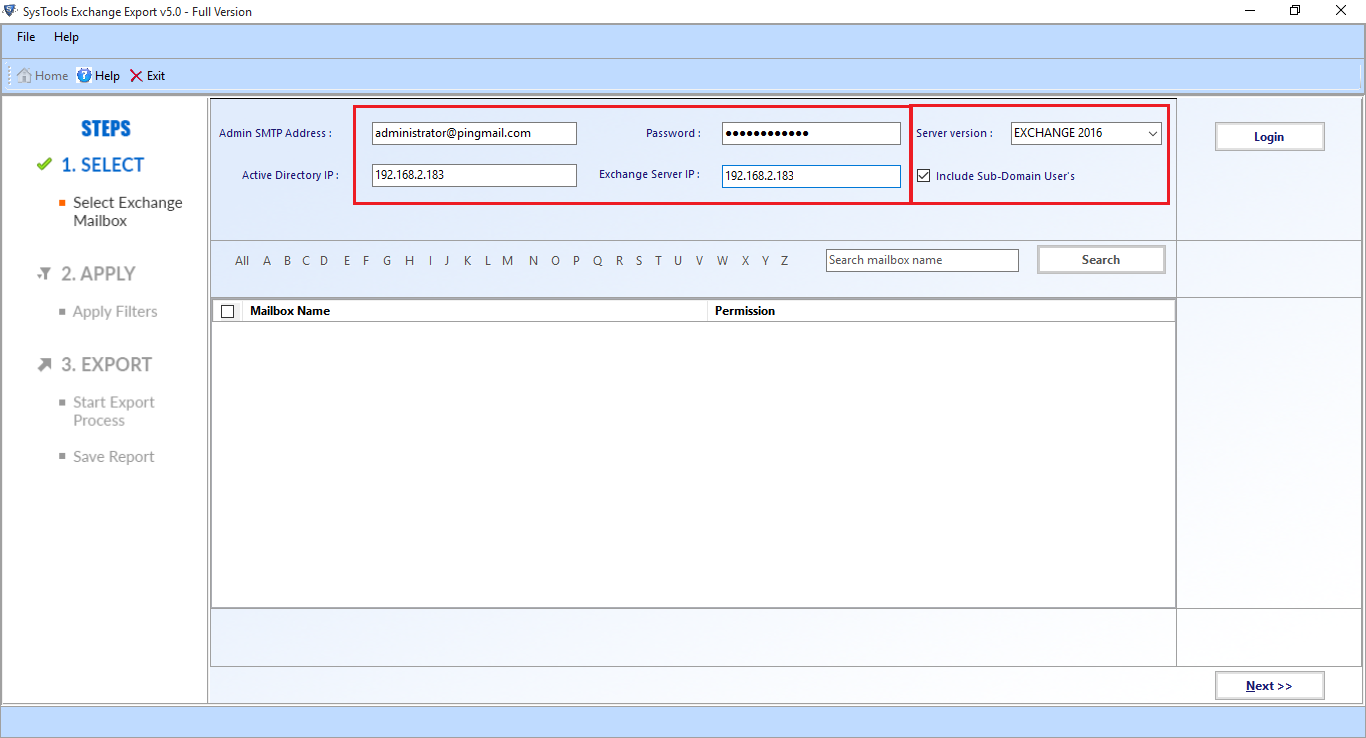
Step-2. After that, Insert the Exchange Credentials >> Choose the Exchange Server Version and Select the include sub-domain user’s >> Hit the Login button.
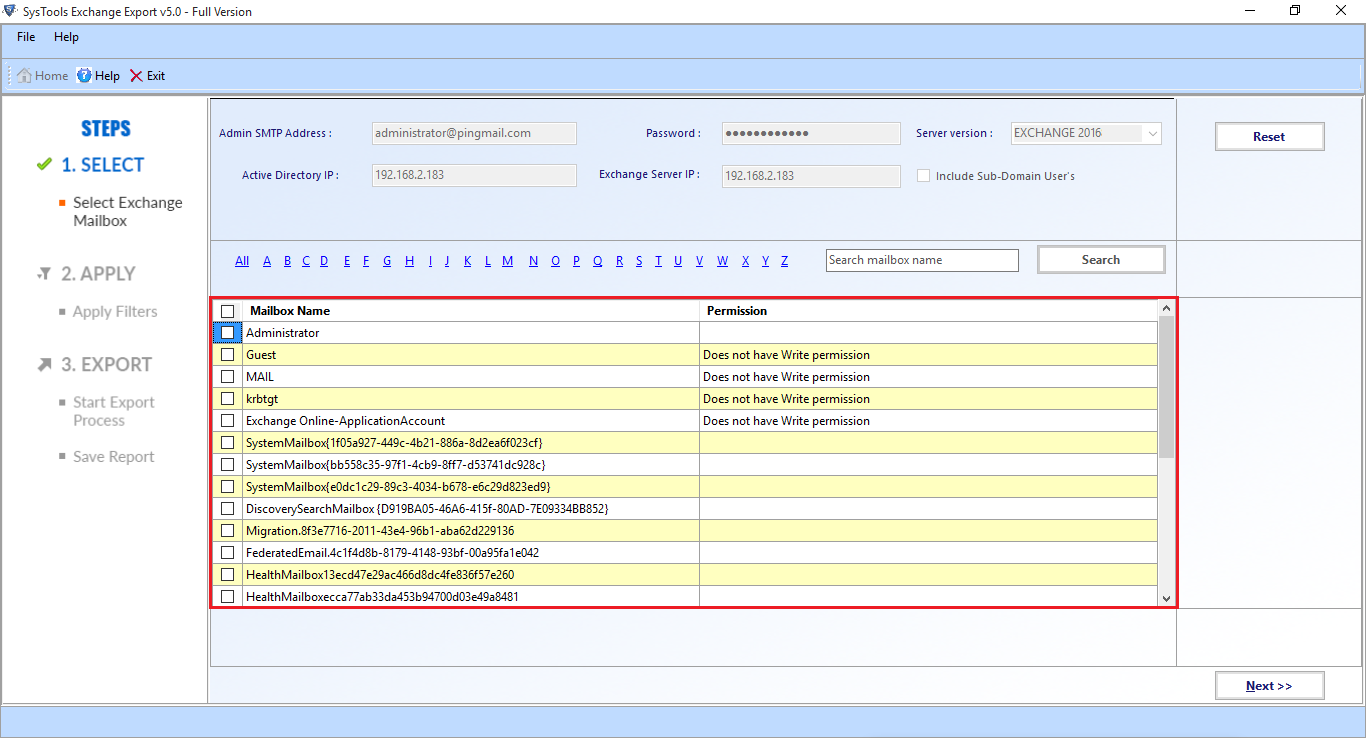
Step-3. Select the Mailboxes that you want to export >> Click on the Next button.
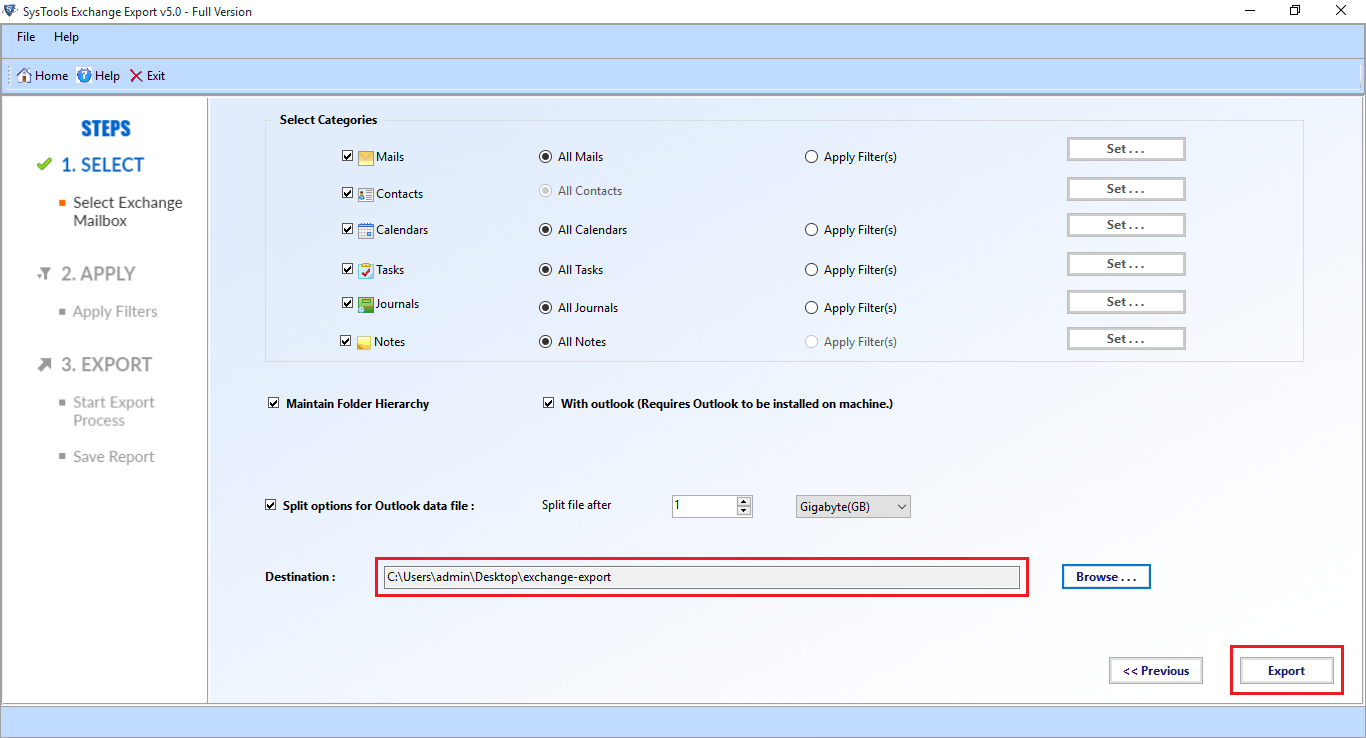
Step-4. Click on the EDB Mailbox Data Items >> Select the given Checkbox and Click on the Browse button to Set Target File Path >> Click on the Export button.
Bringing It All Together
The manual approach involves the usage of new-mailboxexportrequest Exchange 2010 command to export Exchange 2010 mailbox to PST. It is quite obvious that an expert will be able to utilize commands for this kind of data transferring. But, a normal Exchange user or a person having less knowledge about the server will be unable to attempt a manual workaround.
In that case, you can use the advance solution mentioned in the above section which easuly export the Exchange mailboxes from the Live Exchange Server to the Outlook data file in a simplified way without any hassle. Rest, as per your preferences you can select the solution and export mailboxes.