How to Migrate from Exchange 2010 to 2016? Get the Solution


Summary: In this write-up, we will discuss, help users, and provide solutions for how to migrate from Exchange 2010 to 2016. Here users will find the step-by-step instructions to perform the upgrade in the least amount of time without compromising on security. Everything from pre to post-migration is covered in great detail for all users be it seasoned IT pros or first-time database admins.
Many IT organizations and other industry verticals use MS Exchange Server for communication and business purposes. Microsoft is updating the Exchange version and its services day by day. So, that users can easily use its impressive feature and functionality to do their work. Also, on October 13, 2020, Microsoft ended the support of Exchange Server 2010 and because of it, users wanted to do Exchange migration to Exchange 2016 because it provides various advanced features: mobility, cloud deployments, architecture, improved email features, etc
Table of Contents
Reasons to Perform Migration from Exchange 2010 to 2016
As we stated above Microsoft has announced the end of support for Exchange Server 2010. Moreover, the other reason for migration is that the Exchange 2016 is providing many advanced features like:
Exchange 2016 Architecture:
- Simplified with two server roles: Mailbox and Edge Transport.
- Mailbox server combines Mailbox and Client Access roles for efficiency.
- Edge Transport role enhances security for Internet-facing mail flow.
- Allows proxying of traffic from Exchange 2010 to 2016.
Clients:
- Outlook on the Web (formerly Outlook Web App) accessible from major browsers.
- Optimized for tablets, smartphones, and desktops.
- Email improvements, calendar updates, and enhanced search.
- New themes and link previews are available when.
- Inline video player and pins/flags for email management.
- Performance enhancements across Outlook on the web.
- Default protocol: MAPI over HTTP for improved reliability.
Document Sharing
- Users can save and upload files directly on the OneDrive for Business App
- It populates the most recently used lists with a blend of local and online files.
Another set of key changes include:
High Availability: Database availability groups, faster failovers, and enhanced recovery.
Managed Store: Improved Information Store with better resource management.
Workload Management: Monitor resource health and control user resource consumption.
Pre-requisites to Migrate from Exchange 2010 to Exchange 2016
Make Required Changes in Hardware: Exchange 2016 being a more powerful system needs the required hardware to deliver its performance, organizations may have to make additional purchases for the same.
List down the Current Inventory: Includes all user mailboxes, calendars, events, contacts associated with a particular ID, etc.
Take a backup of all data: To act as a failsafe in case anything goes wrong during migration
Select a Migration Method: Cutover for less than 150 mailboxes, Staged for more than 2000, and Hybrid for in-between.
Install Exchange Server 2016
Update Exchange Server 2010 to the latest CU: This is to soften out the migration and minimize the overall changes that the system needs to undergo.
Follow this for a more detailed info: https://www.microsoft.com/download/details.aspx?id=102774
Assign Migration Roles and Permissions: The admin who has the responsibility to undertake the operations must have permissions like “FullAccess” to do the task
Disable EWS throttling: This is done to prevent the inbuilt safety precautions within the Exchange Server from interfering and delaying the migration of data.
Also Read: How to Export All Exchange 2010 Mailboxes to PST File of Specific Date Range Easily
With the prerequisites done and dusted, let’s start with the best method to migrate first.
Professional Choice for Exchange 2010 to 2016 Migration
Through careful evaluation and numerous tests, experts unanimously agree that the best possible choice is the Exchange 2010 to 2016 Migration Tool from . The reason is its simplified architecture and robust algorithms designed to handle even the most complex migration scenarios with ease.
Apart from the obvious, the tool offers several other benefits, such as:
- Effortlessly migrates mailbox elements: emails, contacts, calendars, and tasks.
- Compatible with Exchange 2010, 2013, 2016, and 2019 versions.
- Offers selective migration with Mailbox Category and Date Filters.
- Concurrently migrates multiple Exchange mailboxes using admin credentials.
- User-friendly user mapping methods.
- Includes an intuitive dashboard for progress monitoring.
- Supports user and shared mailbox migration.
- Lets you prioritize Exchange user account migration.
- Three types of re-run migration ensure complete data transfer.
- Migrates sub-domain/OU Exchange user mailboxes.
- Works on Windows Server 2012, 2016, 2019, 2022, and Windows 10 & 11 (64-bit).
Now that the advantages of using the tool are clear users should be informed that there is also an option to migrate offline Exchange 2010 mailbox to Office 365. Now let’s dive straight into the steps for using the utility.
Automated Steps to Migrate from Exchange 2010 to 2016
Step 1. Install a copy of the software on your PC, then Launch it to Select Exchange as both your Source and Target.

Step 2. Go towards the Workload Selection, mark the boxes next to the data type you wish to move, and apply a Date Filter to each one individually.

Step 3. From the dropdown menu, pick Exchange Server 2010 and fill in the rest of the details as prompted by the tool. Once validated, proceed by pressing Next.

Step 4. In the Source section, the Version would be 2016, other data like admin email, password, AD IP, and Exchange Server IP need to be Validated only then click Next.

Step 5. Choose the appropriate mapping method for adding the user data. Fetch for direct linking, Import for premade CSV, or Download Template to edit and reupload a new CSV.

Step 6. Once the user data is visible on the screen, mark and Prioritize by hitting the star icon next to the user. When all selections are done, validate and hit Start Migration.

Steps for How to Migrate from Exchange 2010 to 2016 Manually
Before starting the migration of Exchange Server 2010 mailboxes there are various things to consider. Install the new Exchange Server with all updates. Then install and set the certificates. After that, configure the newely receive & send connectors and test them. Finally, update all the URL of virtual directories and Microsoft Outlook.
If all this is correctly done then users can migrate mailbox from Exchange 2010 to Exchange 2016. Now follow the steps given below:
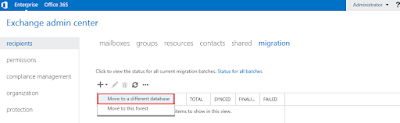
Step 1. Login the Exchange Admin Center with proper credentials
Step 2. Select Recipients >> Click on Migration >> Click on “+” Sign >> Select Move to a different database
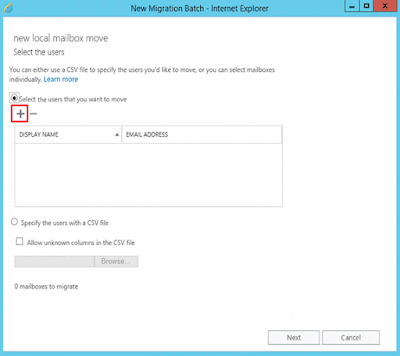
Step 3. Then, the new migration batch will dialogue will open >> Click on the radio button “select the users that you want to move” >> After that click on “+” sign
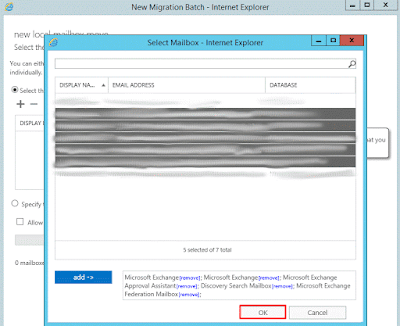
Step 4. Select all the mailboxes & click on Add button >> Then, click on the OK button
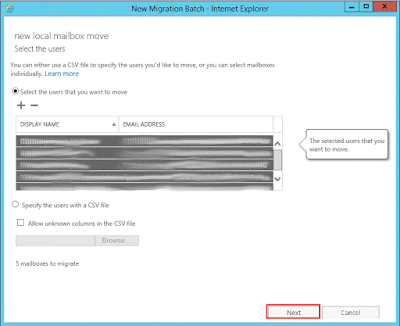
Step 5. Now users can view all the selected Exchange mailboxes >> Click on the Next button
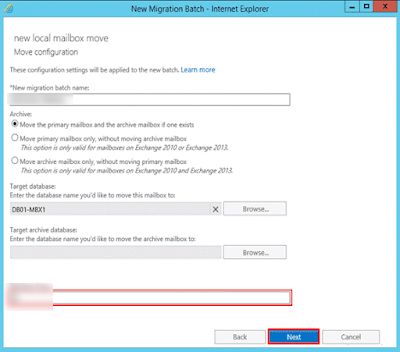
Step 6. Click on the browse button to set target database where you want to move the Exchange mailboxes to the new Exchange Server 2016 >> Click on the Next button
Step 7. Click on the browse button to add recipient for reporting >> Click on the New Button
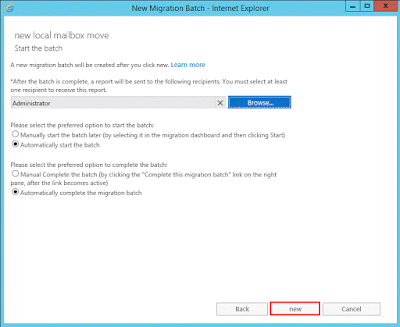
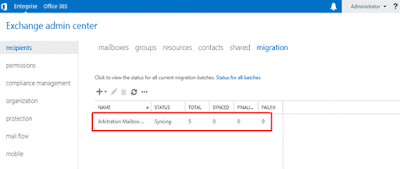
Step 8. Now the migration procedure is started >> Users can view the migration states
When the migration process is completed, users can perform the administrative task such as: AdminAuditLog access, Search multiple mailboxes, and Export Admin Audit Log.
Steps After the Migration from Exchange Server 2010 to 2016
The migration of data itself is not the end of the operation. Moreover, some post-migration tasks still remain, which require manual intervention from the user end.
Create Users and Perform Data Verification:
- Assign official licenses and permissions to all newly migrated users
- Ensure that all user mailboxes and public folders are accessible.
Update MX records and send a test mail flow:
- This is to be done by visiting the domain registrar’s site.
- Once changes are made, verify them via test mail flow, both internally and externally.
Decommission the Exchange Server 2010
- Once migration is complete, uninstall Exchange 2010, as it is no longer needed.
- This is done to save costs and avoid data duplication.
Bringing It All Together
Now users have detailed information on how to migrate from Exchange 2010 to 2016 by using the solution provided here. Also, now you know that it requires in-depth knowledge, technical skills and hands-on experience to perform the migration. So, it is suggested to use the automated solution mentioned here which can easily migrate Exchange Server 2010 to Exchange 2016 in a hassle free way.