Google Workspace Data Migration: A Step-by-Step Guide


So, you want to migrate data to Google workspace (formerly known as G Suite). Maybe you want to move Office 365 user data to G Suite, or migrate emails between G Suite domain.
No matter what, the data migration task is quite tricky. A minute error can cause serious data loss and leaks of important information. It is quite important for organizations to perform the migration with the right approach.
Therefore, in this guide, we will explain the working steps of Google workspace data migration and third-party tools to overcome the limitations of a traditional solution.
Google Workspace Data Migration Tool
Google provides its own native tool inside Google Workspace admin Center. This tool allows the administrator to control the employee’s data. The administrator can use it to migrate Google workspace or Office 365 account data into another Google Workspace domain.
However, the Google Workspace data migration tool has certain limitations that restrict administrators to perform 100% data migration. Due to this, the admin face unnecessary complications during the migration, and the process becomes much less efficient and seamless.
Nevertheless, Google workspace data migration is an in-build application which is good for a particular type of migrations. Here, in this section, we will guide you with the steps to perform the migration. If in case you find this solution in-efficient then we have more efficient and convenient utility as well. Follow the complete guide to read about it!
Step-by-Step Working of Google Workspace Migration Service
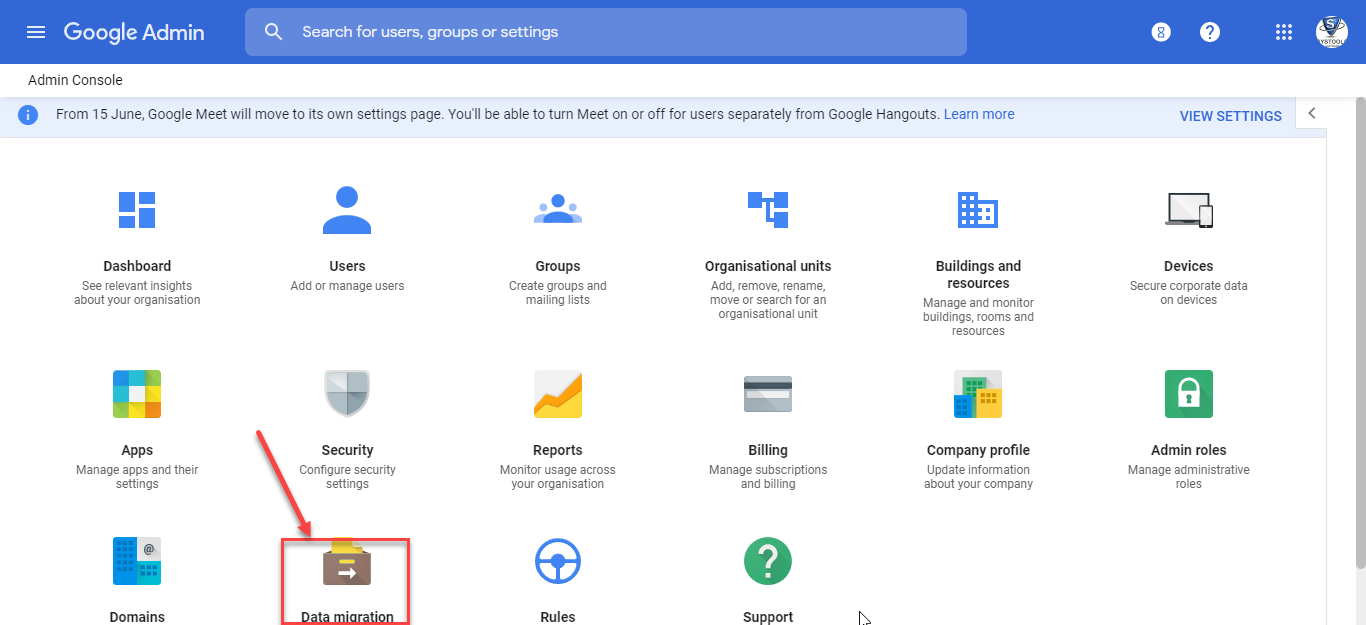
1. To initiate the migration, first, open the destination Google Workspace admin console and choose “Data Migration”.
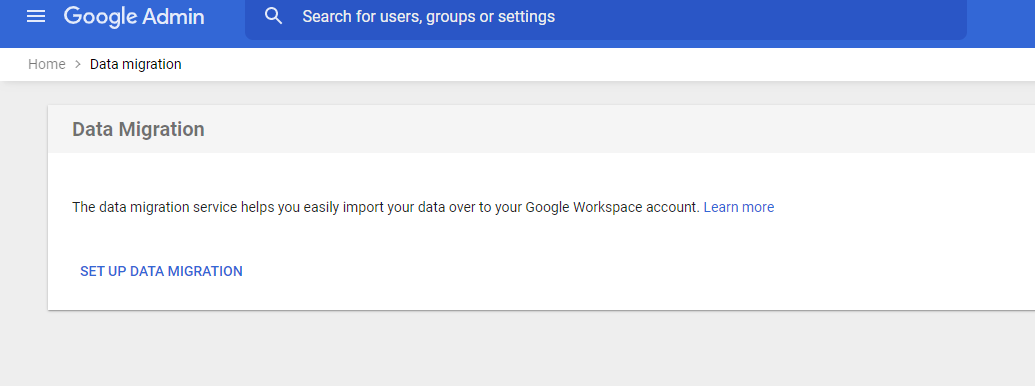
2. In the next window, click on the “SET UP DATA MIGRATION” button to proceed further or click on “Learn more” to get more information about the migration process.
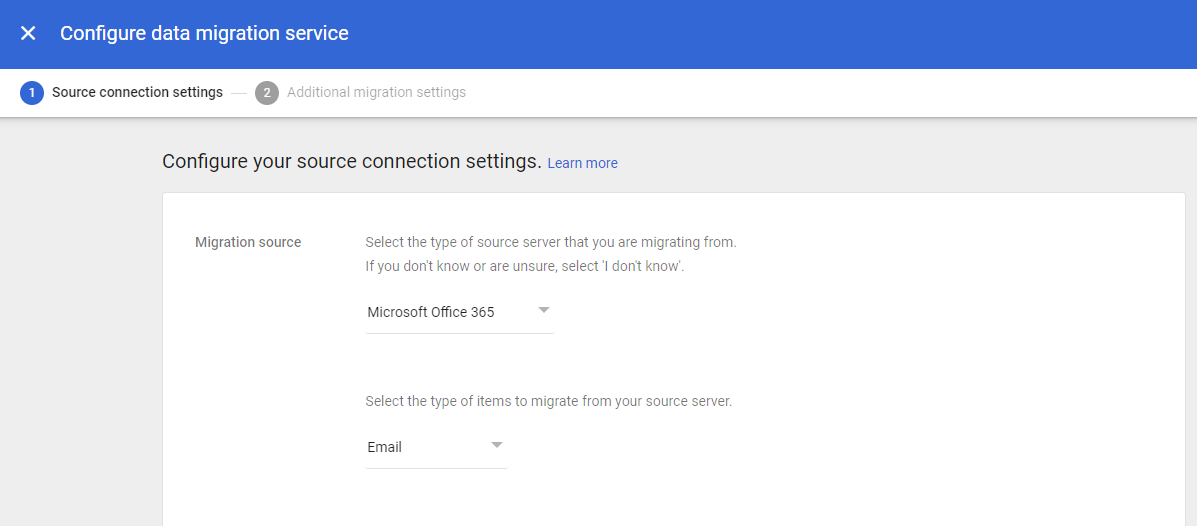
3. The data migration window will open and here you need to select the Source Platform.
- Google Workspace: If the source platform is also Google Workspace then the rest of the field will get invisible.
- Office 365 (Microsoft 365): If the source platform is Office 365 then select:
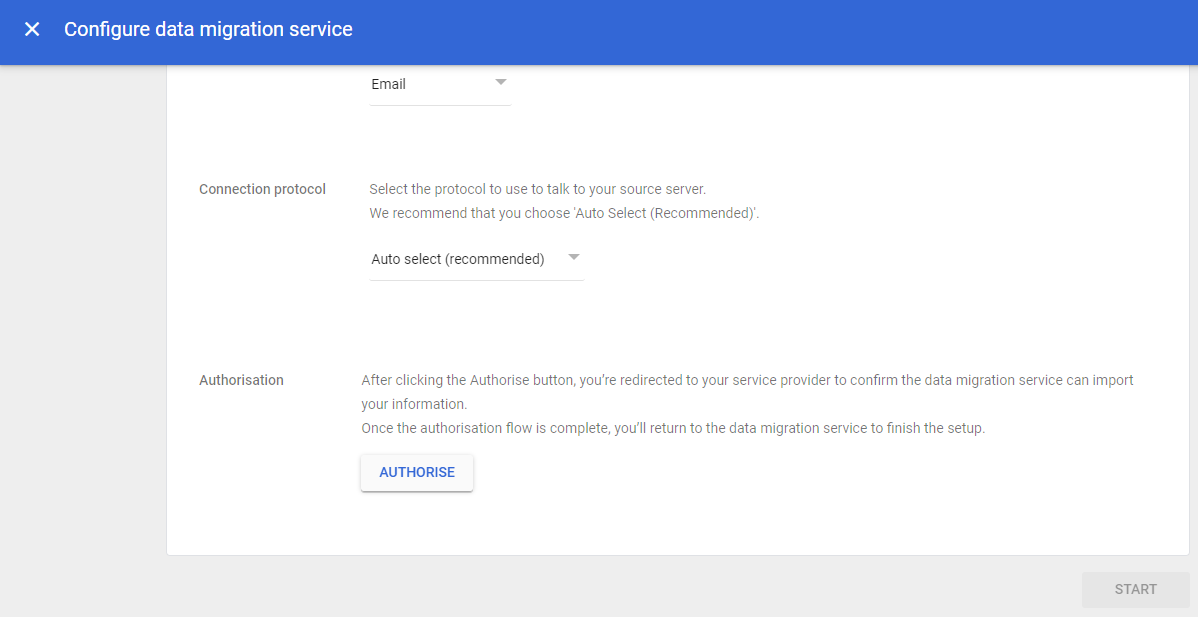
- Type of Item to Migrate: Emails / Contacts / Calendar (one at a time)
- Connection Protocol: Auto Select (Recommended)
- From the Authorization section, click on the “Authorise” button.
- This will navigate you to Microsoft Office 365 login page for admin login. Once the authentication is finished you will get you back to the Google Workspace admin console.
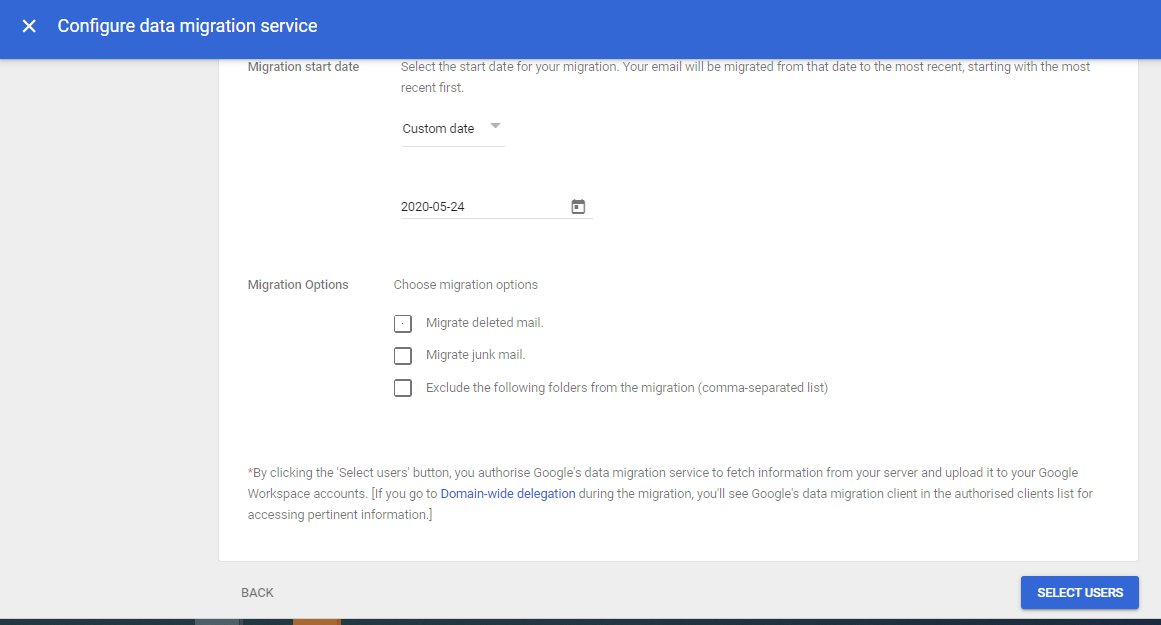
4. From the next window, setup the Migration Start Date and select Migration Option. Then, click on the “Select User” button to proceed further.
5. Now for mapping of source and destination platform user account, there are two options:
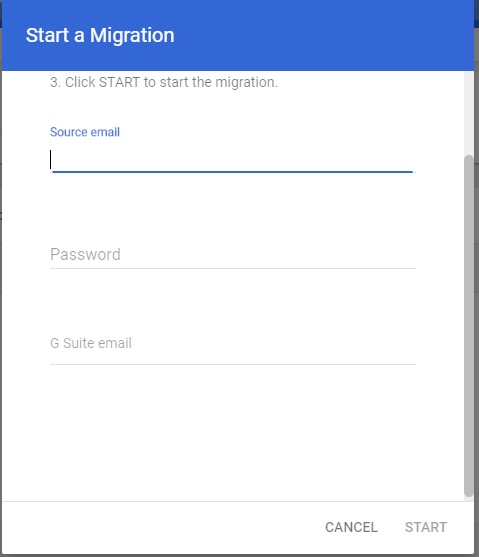
- Add User: This option can be used to map a single source and destination user account. Provide the details of the source account and select the destination Google Workspace account.
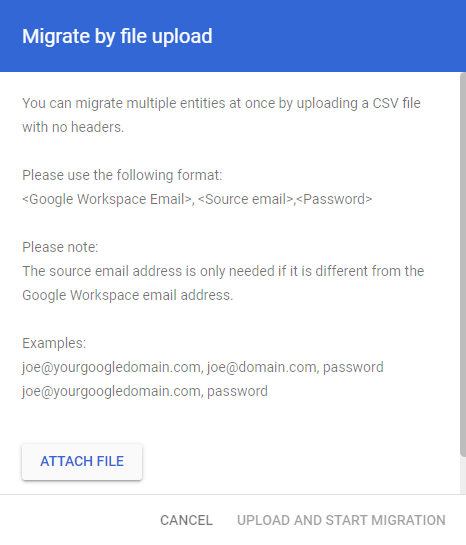
- Bulk Upload CSV: This option allows to import a CSV file that carries the mapped list of source and destination user account in the format of: <source emails address>, < destination address>, <password>. Click on Attach File to Upload and begin the migration.
6. You can view the live process of on-going migration and done once the Google workspace data migration completes, click on “More” and then “Email Report” or “Exit Migration”.
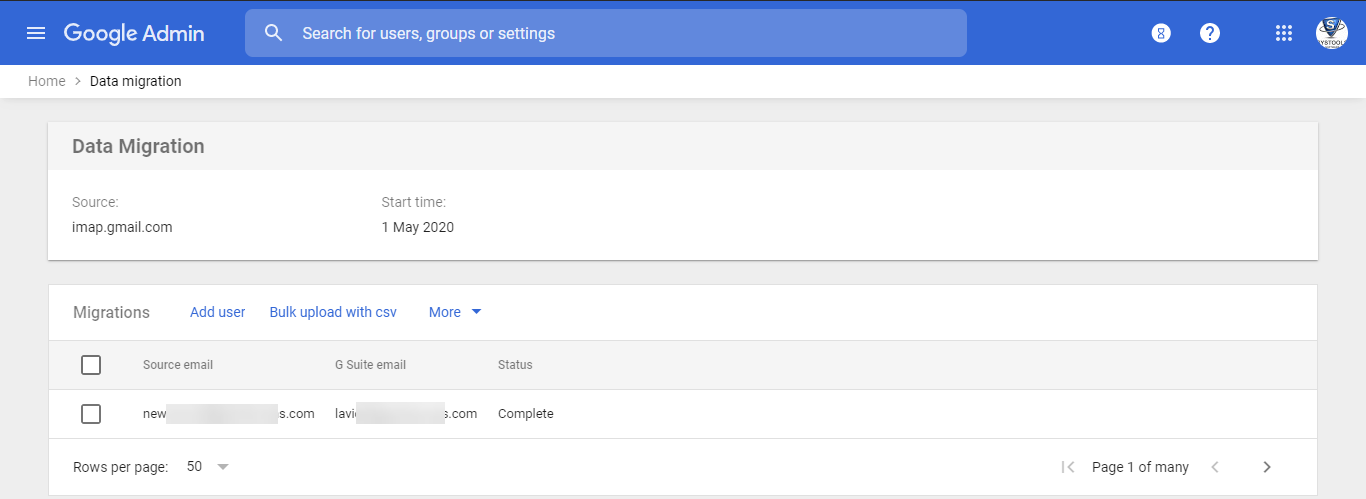
Open the destination Google workspace account and check for the migrated data.
Technical Limitations of Google Data Migration Service
- Facility to migrate only emails between Google Workspace account
- Migration from Office 365 can be perform for emails / calendars / contacts.
- Requires to enable IMAP for each user.
- No option to migrate documents to Google workspace account
- Failure in migration during a weak internet connection.
Professional Google Workspace Data Migration Solution
The above utility from Google we talked about has many technical limitations that the admin has to deal with during data migration to Google Workspace. If you need to migrate complete data to Google Workspace account in bulk, the traditional utility maybe in-efficient and may result in data loss. Additionally, the time taken by the process is quite high.
Therefore it’s recommended to use automated third-party party utility like G Suite to G Suite Migration Tool. This tool provides end-to-end encryption during the migration process. Moreover, it’s a powerful alternative for a traditional solution that can migrate emails, contacts, calendars, and drive data seamlessly and accurately.
Workings Steps of Professional Data Migration Tool
1. Use the below button to download the software and install it on your Windows or Linux System.

2. First click on the Activate button for the activation of the DEMO or PAID version of the tool.
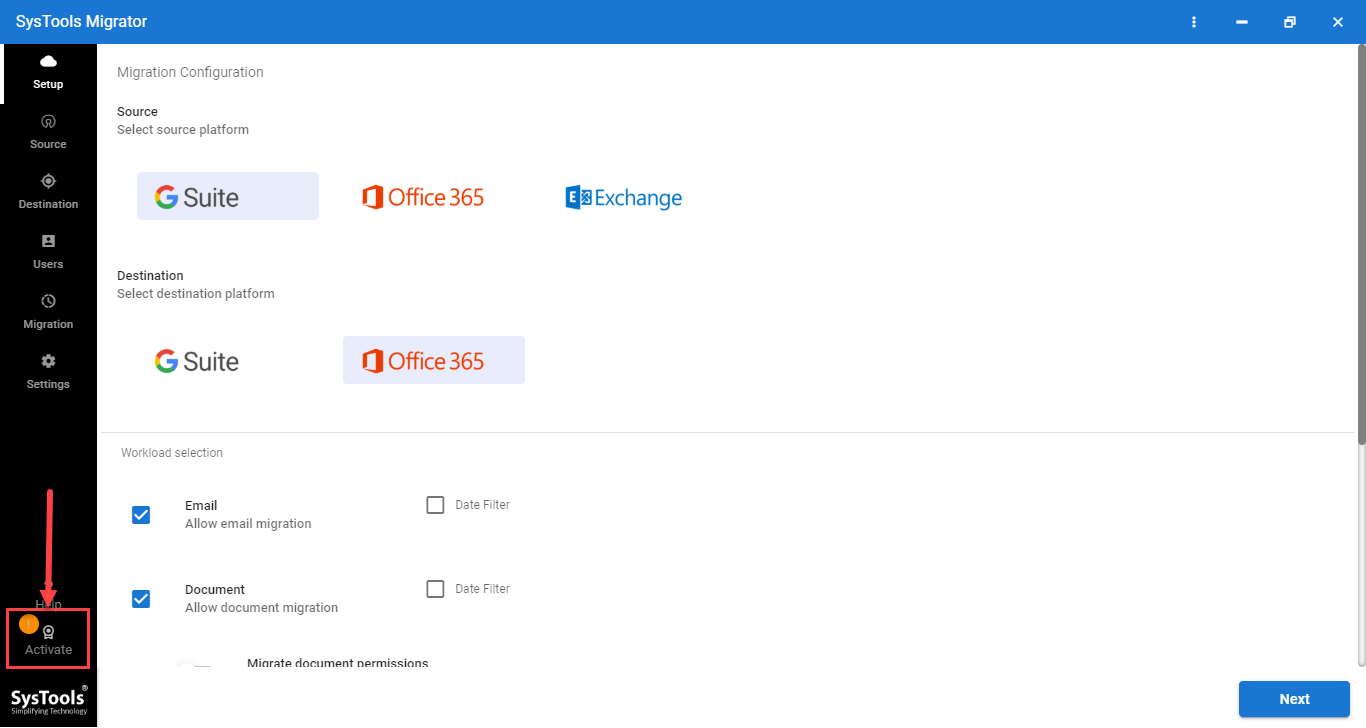
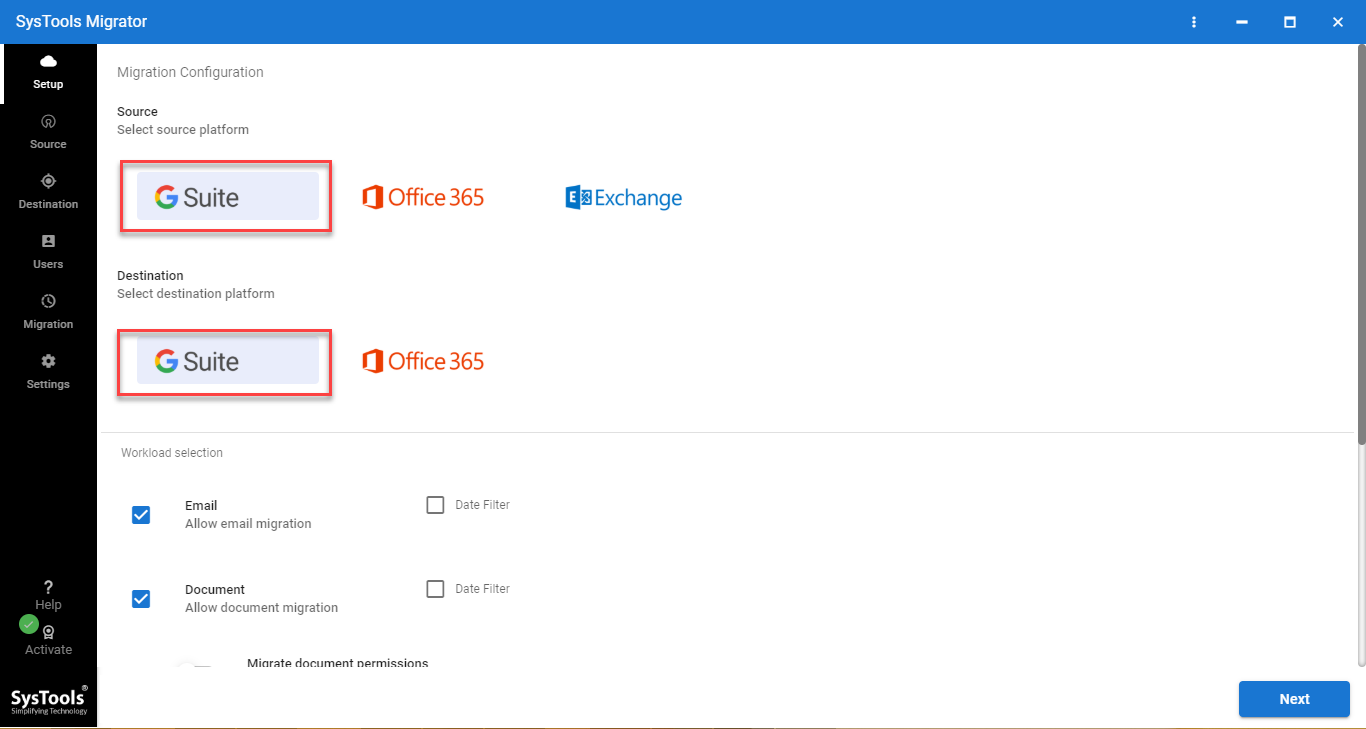
3. After completion of activation, Choose the Source platform (G Suite or Office 365) and then select the destination platform as “G Suite”.
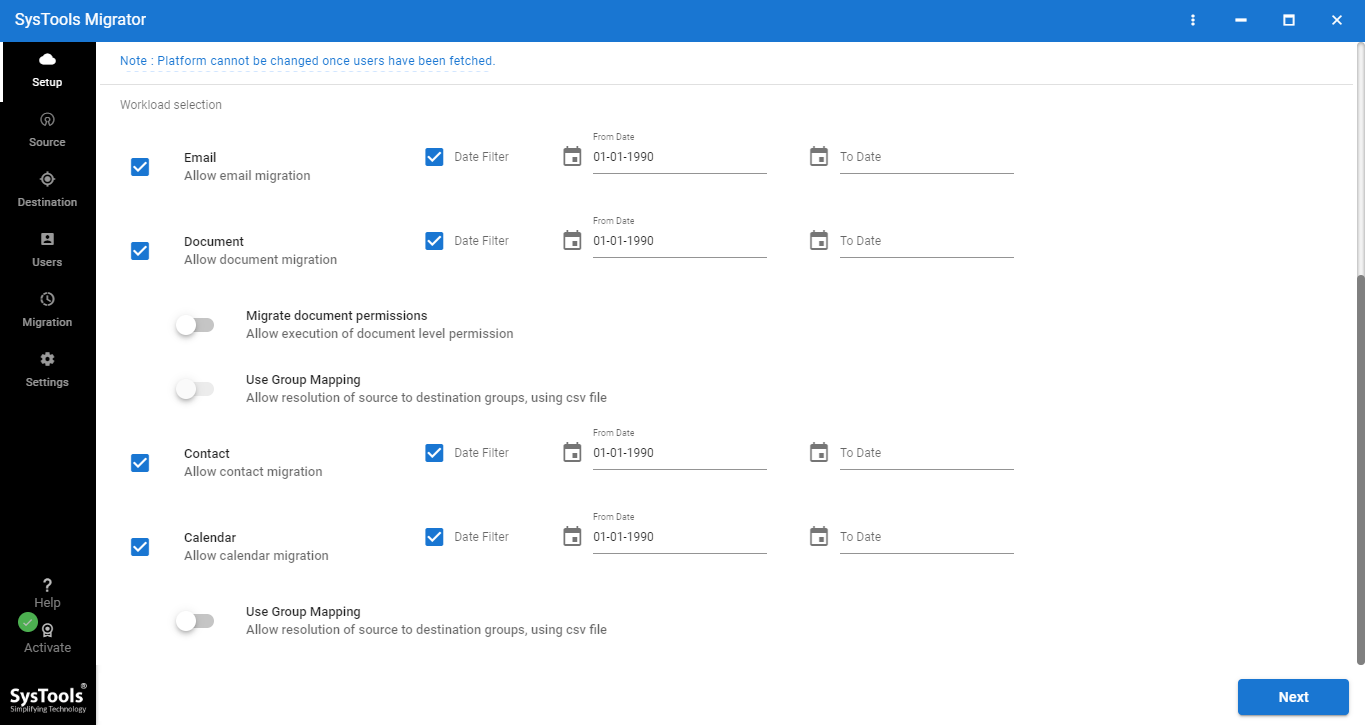
4. Now, scroll down to the workload section to select the category (emails, contacts, calendar, documents) and apply the date-range filter for selective data migration. Also select calendar and documents permission option to pass access rights to destination accounts.
5. Once all the items that need to be migrated are selected move to the Source tab. Here, enter source Admin id and provide application id. To know how to create an application id click on “Project Settings”. Once all fields are filled, click on the Validate button to authenticate the entered details >> Next.
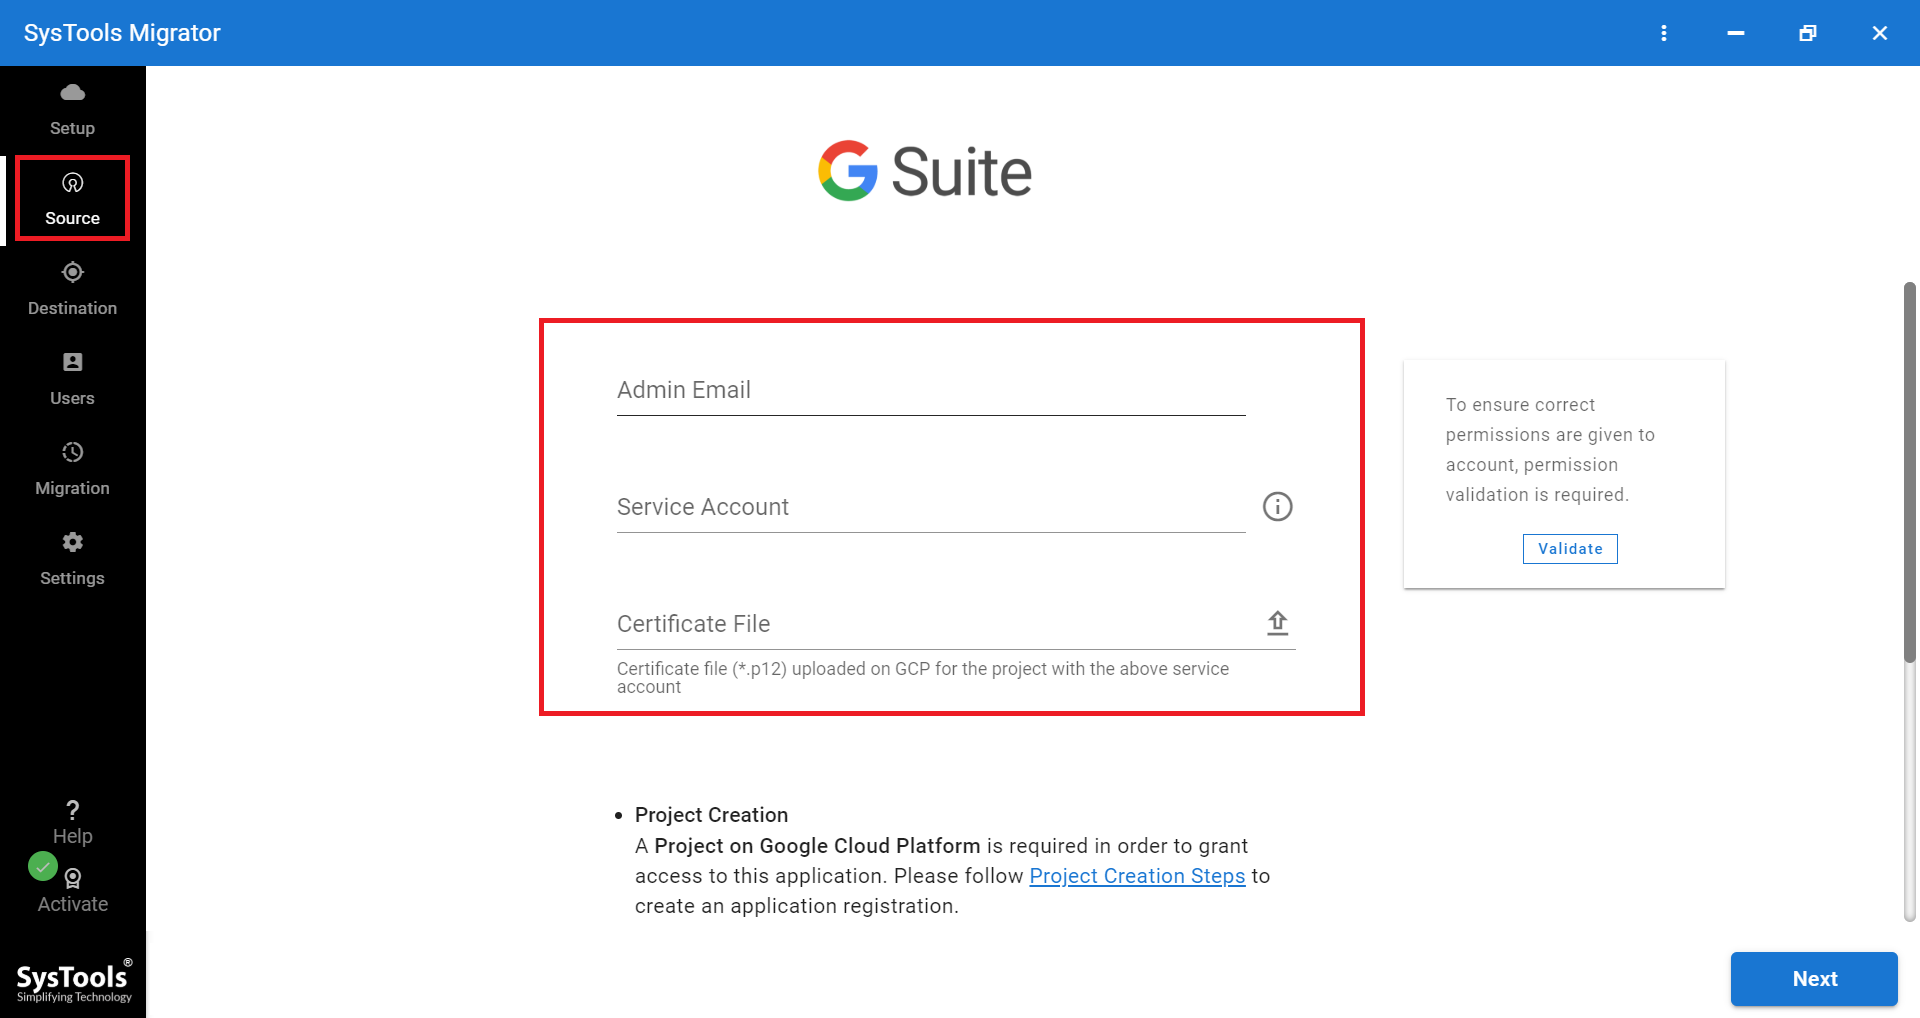
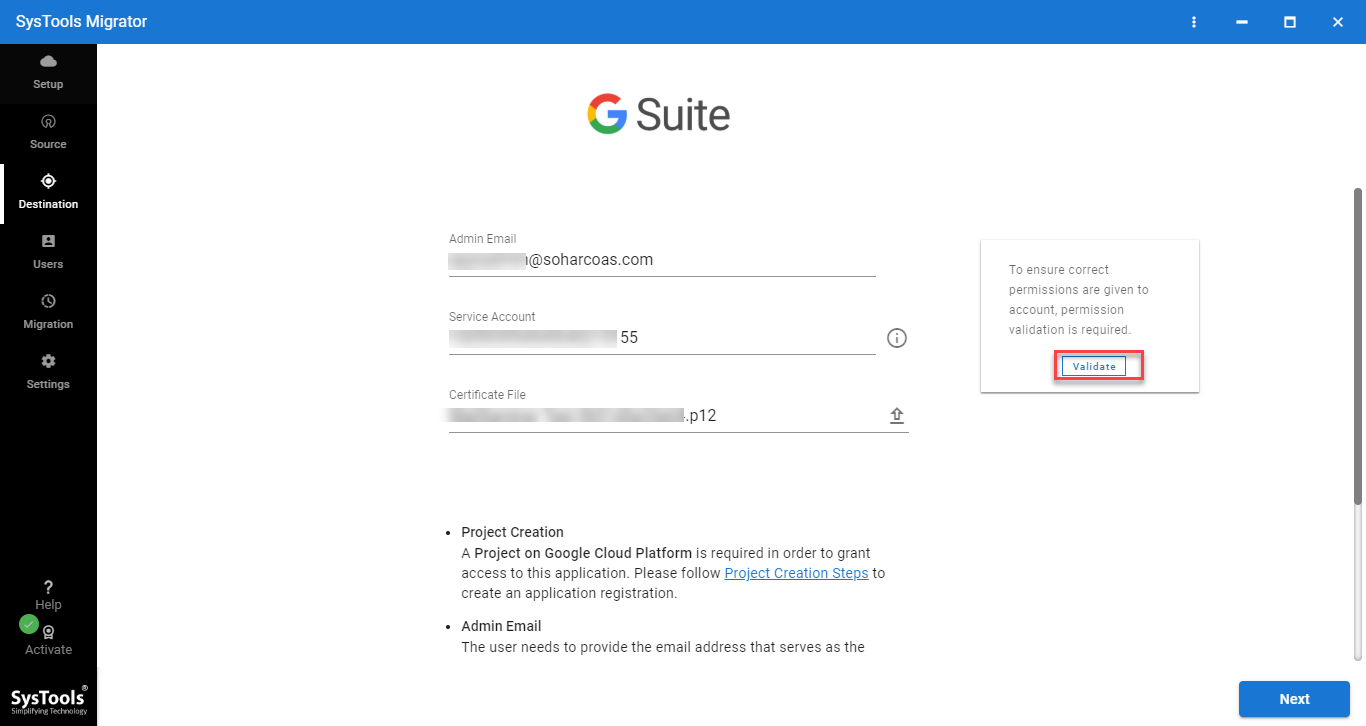
6. Now, in the destination tab, enter Google Workspace (G Suite) admin email id, application id, and p12 file path. To create a p12 file and application id, click on “Project Settings”. Finally, click on Validate for the authentication of the Google workspace domain.
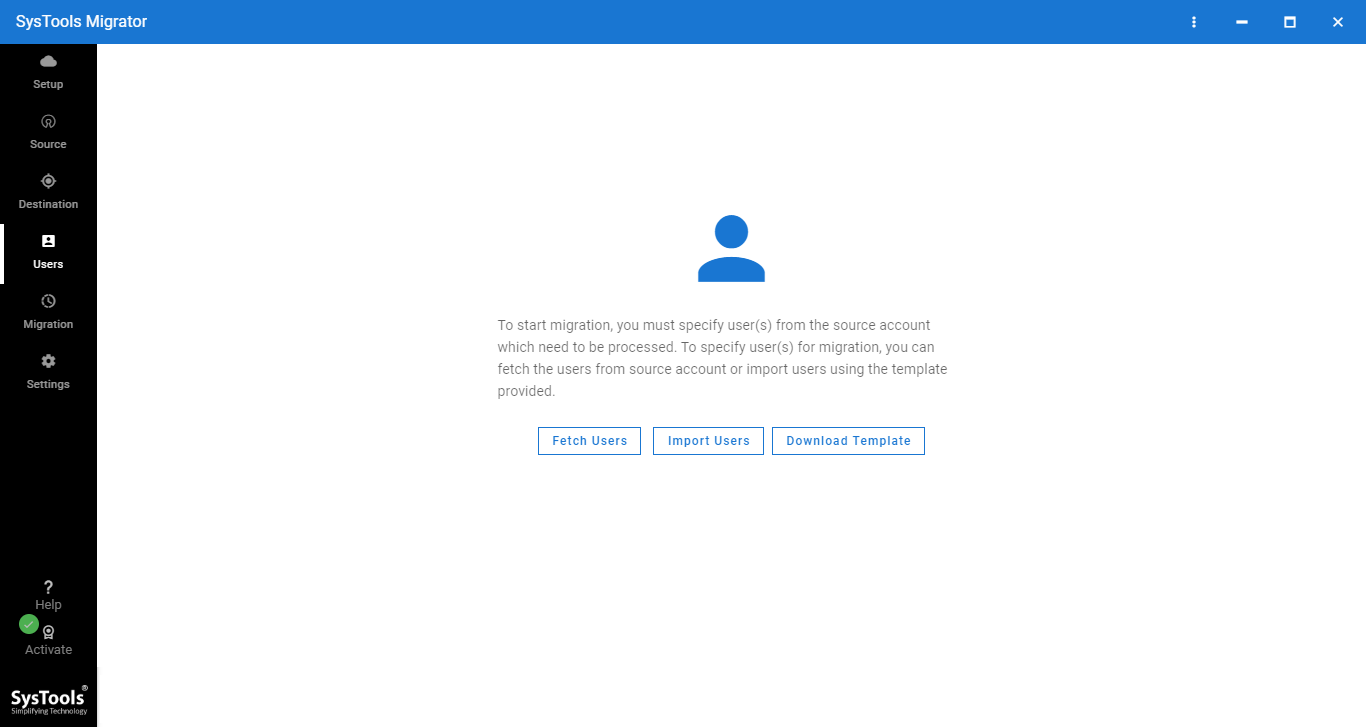
7. In this window, choose the option for source and destination platform user id mapping. The tool offers two kinds of mapping options:
- Fetch User: Use this option to auto fetch all the user ids from the source platform and list them on the tool. Once fetching is complete you can enter the destination user id in each field for mapping.
- Import Users: Use this option for importing a CSV file containing a list of mapped source and destination user accounts.
8. Once the mapping is finished, click on the Validate button for user account authentication. Finally, click on the Start Migration button to begin the process.

Just by following the above steps, you will be able to migrate complete data to Google Workspace account in a seamless manner.
Final Words
In this guide, we have explained the step-by-step working of Google Workspace data migration service and an automated tool. We have explained the benefits of each solution and how a professional solution overcomes all the technical drawbacks of a traditional solution. So, now you can test both methods and pick the one that suits your organizational needs.