How to Create a Password Protected PDF File (Guided Steps)


PDF work as a paper document, that is mostly used on the internet to share information. No matter how confidential the information, it is one of the most secure document files. Standard & Quality, On every machine, it appears the same regardless of the fonts installed on the system. And typically it is difficult to create PDF documents when they are secured. But to secure a PDF file, you need to know how to create a password protected PDF file. OR how to secure pdf document from copying, editing, printing, and with a password.
Fortunately, password-protected encryption within the PDF format is supported. Whether it’s Win OS or a Mac OS this knowledge base guide will take you through each of them, step by step.
How to Secure a PDF File on Windows 7/8/8.1/10?
It’s not easy to set a password-protected PDF file on Win 7/8.1/10 OS. However, some utilities such as those described in this article can do the task with ease. Because of Mac OS, Windows does not offer any built-in tool.
Adobe Acrobat Pro can cost you more expensive. Fortunately, you can go with a free 7-day trial version of Adobe or try any other low-cost utility like the PDF lock Tool that has emerged as the best PDF security expert’s recommended tool and it’s cheaper than Adobe. Let’s Check out their working methods to create a password to protect PDF files with PDF lock software, Microsoft Word, and Adobe Acrobat Pros DC free trial.
Create a Password Protected PDF File With PDF Lock Tool
Try Out this PDF lock Software to add both types of types of passwords(Document open password, Master Password) in the PDF, this tool provides latest encryption algorithm that is not get decode easily from the unknown potential thereat. This tool discount offers are going on for new customers and it provides more options than Adobe Acrobat and you can try out this tool as sample version to find it’s working which is undeniably is excellent. Follow the below steps to add password to PDF by using the immersive user interface of this tool.
Steps To Add Password Protection To PDF
Step 1 – First you have to download the software and open it once it’s opened now click on the Add File(s) or Add Folder option to add the PDF Files to protect it.
Step 2 – Once you selected your desired file now choose its location after its conversion select the path or change the default location to save the password-protected PDF.
Step 3 – It’s time to select the measurable output that you want from the file, Navigate to the Settings tab and choose the Apply Document Restriction and other settings from here.
Step 4 – If you implied all the settings from the above now you need to Enter the Password to lock the PDF and apply the restrictions.
Step 5 – At the end, once you applied all the settings, Click on the Lock button to end the process and once it’s saved it will show you the summary and location of the file.
Protecting a PDF File With Password Using Adobe
Follow the below steps to add password to PDF file
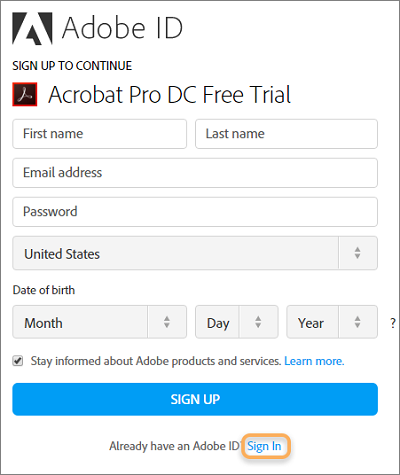
Step 1 – To Install, Visit the Adobe Acrobat Free Trial Download Page.
- Here, Click on Get Started and Fill out the form to sign up for your account and get Adobe ID.
Step2 – When Downloading starts, the welcome page is displayed.
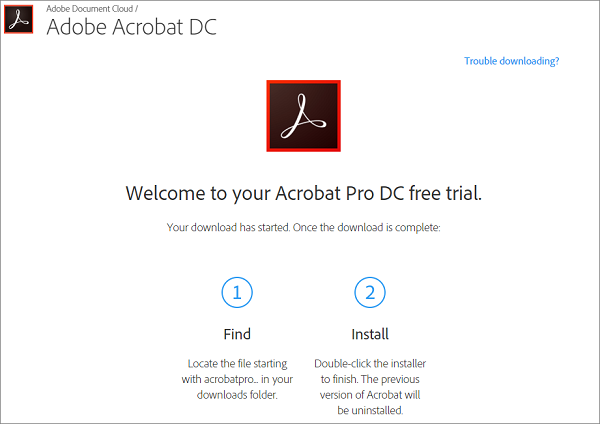
Step 3 – If Adobe Acrobat Reader is not installed on your system, you’ll need to install the DC Pro version, now simply continue with a free trial.
Step 4 – Once Adobe Acrobat Pro DC is launched, Sign-in using the button in the top right-hand corner. Then, click the “File” menu >> select “Open”. Choose the PDF file to create a password-protected PDF file >> Click the “Open” button.
Step 5 – You can see the unprotected PDF file. Now again click the “File” menu >> Drop down to “Properties” or just press “Ctrl + D”. Document Properties panel will open.

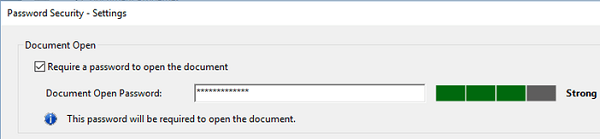
Step 6 – Click on the “Security” tab. Beside “Security method” drop-down and select “Password Security”
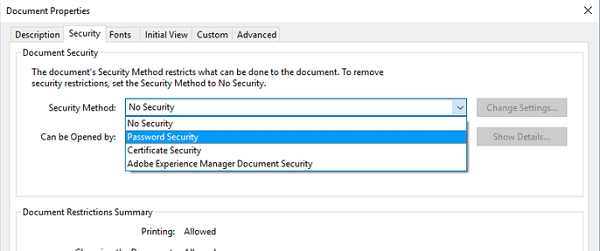
Step 7 – Now you can see a new Window. Check the box “Require a password to open the document” and In the Password field put a secure password that you can easily remember.
Note: Now you have learned to add password protection to PDF, but if forgot the PDF file password. It will become difficult for you to access your Documents or retrieve the lost Password.
Always use a different password other than you use for accessing other services, in case you are sending it to others. Adobe will even rate how difficult your password will be to guess, so try to use a strong one. Preferably you should use a combination of upper, and lower-case letters, special characters, and numbers.
Restricting Print/Edit/Copy option with Adobe Acrobat
To create a password protected PDF file only by adding a password is not sufficient. Adobe Pro additionally allows you to password protect certain tasks such as editing and printing.
Follow the below steps to secure PDF by adding edit & print restrictions:
Step 1: Follow the above steps from Step4 to Step6 and Open the Security panel.
Step 2: Drag down to the heading ‘Permissions’. Check the box you may see beside ‘Restrict editing and printing of the document’.
- Here you may see two options Printing Allowed & Change Allowed.
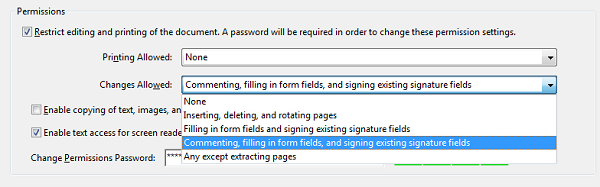
Step 3: In both, you may choose options by drop-down options. Select one of them as per the need to secure a PDF file.
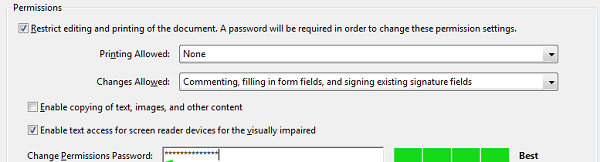
Step 4: Once you made all tweaks enter a password in the box “Change Permissions Password.”
Finish!! So, now you have created a password-protected PDF file. When opened, the password window will automatically prompt.
How to Create a Password Protected PDF File with Microsoft Office?
For this, you need to create an office document and then export it as a password-protected PDF file. You may get an encrypted PDF file with the password you provided.
Follow the steps to make a password-protected PDF file:
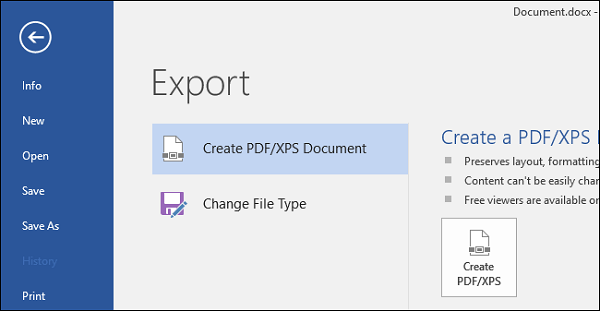
Step 1: Open the document in MS Word, PowerPoint, or Excel, Click the “File” menu >> select “Export”. Choose “Create PDF/XPS” to export.
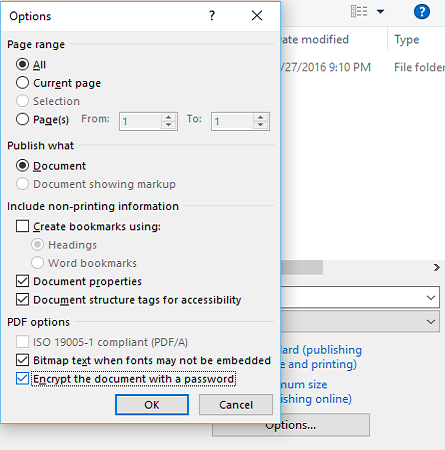
Step 2: New window will appear to save the PDF file, Downside you will find out “Options” button. Click on it.
Step 3: In the Options window, check the box beside “Encrypt the document with a password”. Click OK.
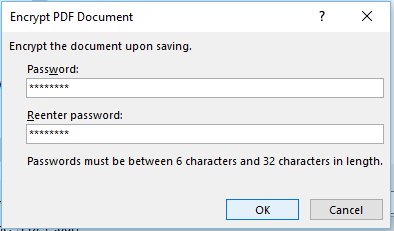
Step 4: Enter the desired “Password” and “Re-enter” it to confirm the password and click “Ok”.
Tip: If you’re more interested to remove restrictions from PDF documents, we have a great PDF Password Unlocker Tool to remove editing/copying/printing restrictions.
For Windows:
For Mac:
Conclusion
Now that you know how to create a password protected PDF file, what if you get a secured PDF file, and how to unlock it? You may try the demo version of the free PDF Unlocker to take the test. In the beginning, you may find out the link to download a free utility.
Also Find: How to Make PDF Password Free in Most Simpler Way