How To Make Pendrive Bootable for Windows 7 Using CMD


If you ask about a fastest way to install Windows 7, the answer would be using a Bootable Pendrive. It is faster than the installation done using the DVD and hardly takes 15 minutes for the procedure. But, first you will have to prepare a Windows 7 bootable pen drive. This guide will let you know how to make Pendrive bootable in a perfect step-wise elaboration using CMD. The process described here will not require any external tool or software program.
Set-up Requirements:
- USB 2.0 Pen Drive (4GB+ Memory)
- Windows 7 DVD install disc/ISO image
- PC with Windows Operating System
- Basic skills to run CMD Prompt
|
Analysis Prior Starting:
Plug-in the Pendrive and make a safe copy of all the data in it. As the Pendrive needs to be formatted, it is better to remove all the important files from it. Install the DVD of Windows 7 on same system but do not go for the installation process.
Now open “Computer” and note down the Drives for both Pendrive and DVD drive with Windows 7 installation DVD.
Like for this experiment;
- DVD Drive: “D”
- Pendrive: “E”
The process is very simply explained and thus you need not to worry if you are unaware of the cmd techniques.
Step-Wise Procedure:
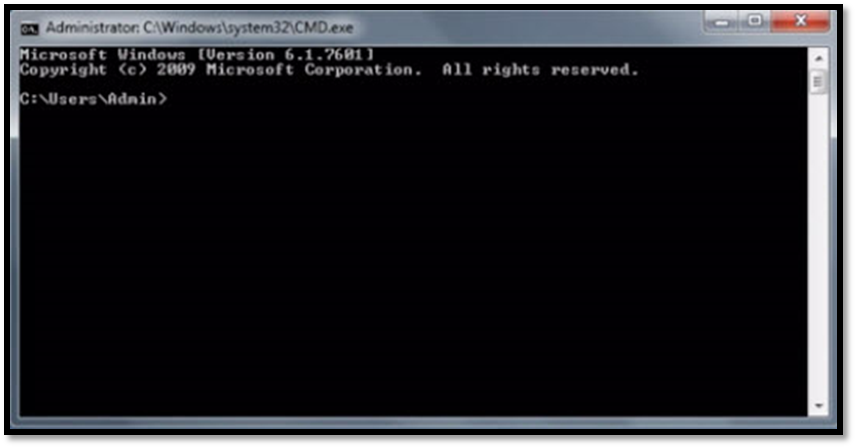
Step 1: How to Start Command Prompt?
- First of all go to Start Menu and type cmd on search option.
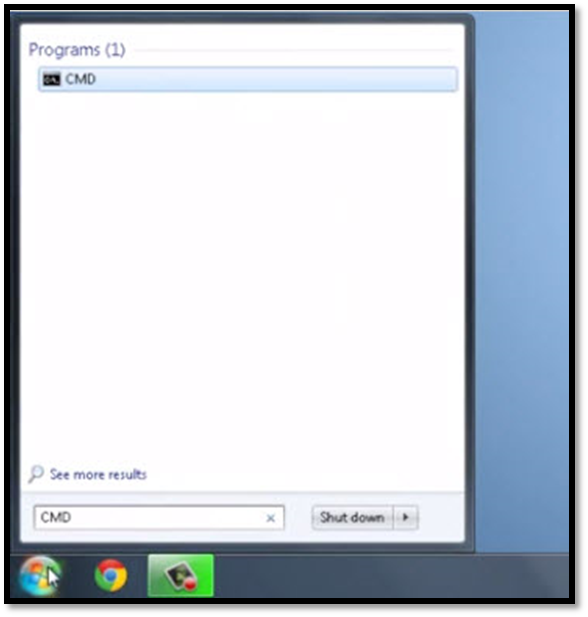
Goto Start > CMD
- Right click on cmd and select “Run as administrator”.
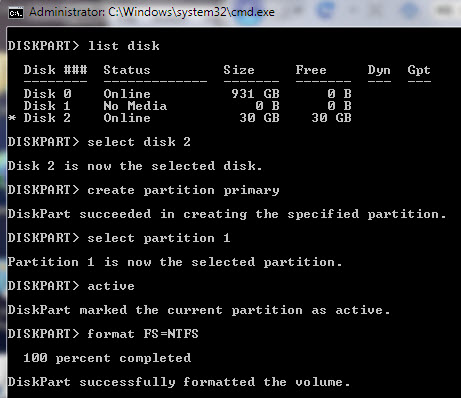
Step 2: Load Diskpart Application & Display all the Drives:
- Type “diskpart” and then hit enter.
- Then type “list disk” to make all the disks available:
- Now you will be able to see all the drives as DISK # along with their status and size. It is quite easy to judge which Disk belongs to which media. For your understanding here in image you will see;
Disk 0 – 931 GB
Disk 1 – 0 GB
Disk 2 – 30 GB
So, quite obviously Disk 2 is our Pendrive of 32 GB (near in size) on which operation has to be done.
- Now type “select disk 2” and hit Enter.
|
- You will get a successful response message as “Disk 2 is now selected disk”.

Diskpart
Step 3: Clean the Pen Drive:
- Now type “clean” and then you will get a message as “DiskPart succeeded in cleaning the disk”.

Step 4: Format the Pendrive:
- Now type following commands and hit Enter after each of them;
- select disk 2
- create partition primary
- select partition 1
- active
- format fs=ntfs quick
- Also check for the response messages generated after the commands are entered.
- This formatting will take time and it depends on the Pendrive size as well, you will also see percentage readout here.
List Disk
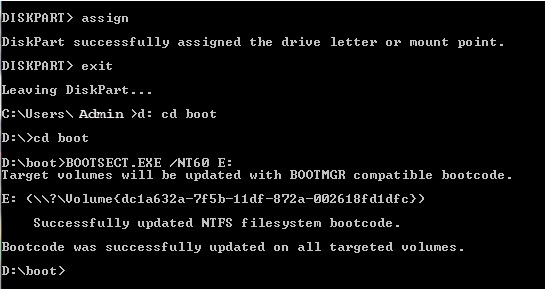
Step 5: Exit the DiskPart and Proceed to Make Bootable Pen Drive:
- Type following command to assign mount point and exiting DiskPart.
- assign
- exit
- Now use the bootsect utility which comes with Windows 7 from the installation CD.
- Here the DVD drive is D and Pendrive drive is E.
- Go to the directory where bootsect is present means drive “D”, for this follow the command;
- d: cd boot
- cd boot
- Now type;
BOOTSECT.EXE /NT60 E:
Note: Here you have to change “E” as per your Pendrive Drive.
- You will get a response message as “Bootcode was successfully updated”.
Step 6: Exit Command Prompt and copy files form Windows 7 DVD to Pendrive
- Exit cmd by clicking close option on cmd.
- Copy all the files from the Windows 7 DVD to Formatted Pendrive.
- You can now anytime use this Pen Drive in order to install Windows using Pen drive.
Conclusion:
The output you will receive is a Windows 7 bootable pen drive which can be used for;
- Perform diagnostic checks on computer having hardware issues.
- Unbootable Windows 7 machine.
- Installing Windows 7 in less time instead of using installation CD.