How to Backup/Restore FlashFXP Configuration


The page gives detailed information as how to backup/ restore FlashFXP configuration. However, to understand the backup and restore process it is essential to be in acquaintance with FlashFXP, its features and purposes that can be fulfilled with it.
FlashFXP – A Brief Introduction
FlashFXP is nothing but a File Transfer Protocol (FTP), Secure File Transfer Protocol (SFTP), File eXchange Protocol (FXP) and FTPS (an extension of the commonly used File Transfer Protocol) client. Based on Windows operating system, it supports both server-to-server and client-to-server type of file transfer. Above all it provides a safe, secure and efficient file transfer hence is reliable enough. It can be downloaded and installed on any Windows system for publishing and proper management of user’s websites. It can also be used to upload and download various types of multimedia data like text documents, audio files, videos, and pictures. Again, it also offers data sharing amenity amongst the team with the powerful site manager feature that it holds. It has the ability to transfer or backup files locally as well as from remote machine. Moreover, with its powerful transfer scheduler functionality, transfer of files can be scheduled and automated by users.
Its latest version 5.0, released on 12/12/2014, priced at $29.95 USD and of 5.2MB is even more advanced as compared to older releases. With PCRE pattern matching and new macro commands having been included, its working performance has considerably improved.
An Insight Into Its Key Characteristics
- Provides full support to FTP, FXP, FTPS and SFTP client.
- Renders safe and secure encryption technology with SSL.
- Supplies extensive support to both UTF8 & Full Unicode.
- Transfer of files depends on rules based on size &/or date.
- Endows users with file search option in remote server.
- Grants remote edit option with automatic upload on save.
- Provides automatic transfer of files with notifications by mails.
- Multilingual as it is available in about 20 different languages.
Know the Backup/ Restore Process in FlashFXP Client
For users of FlashFXP, the query: how to backup/ restore FlashFXP configuration is a common one. This is because it is one of the most important tasks that users need to employ so as to be able to share files with team mates, friends and co-workers. Once shared, the backup needs to be restored by others to view or access the shared documents.
Backup Process Explained
The below-mentioned steps must be followed to create the healthy backup of FlashFXP contents.
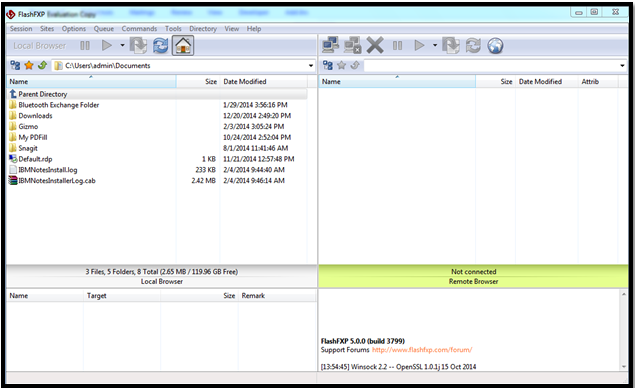
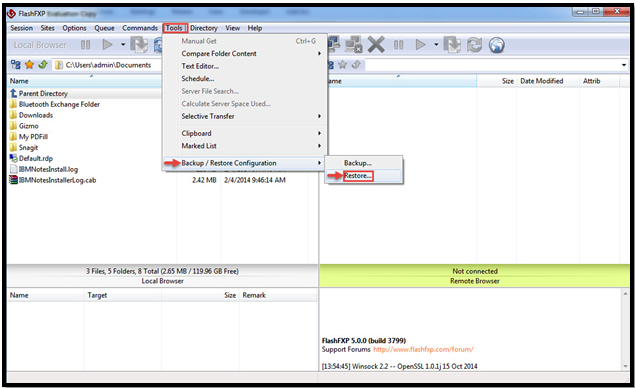
1. Open FlashFXP client. Its interface appears as shown in the image below.
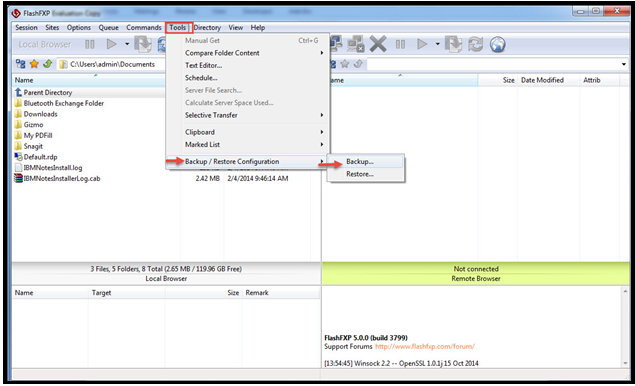
2.In the main menu, click on the tab Tools, then take mouse to the option Backup / Restore Configuration and click Backup tab to proceed with backup process.
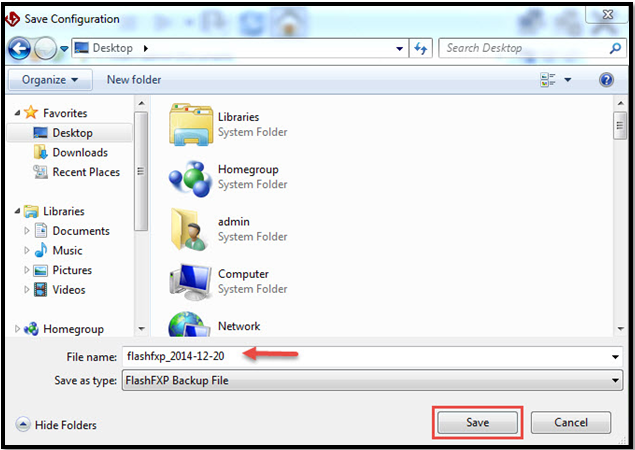
3.Then, save the configuration to a file at any desired location on the system by clicking on Save as shown below in the image. In this way the configuration gets saved with file name: flashfxp_<date> and file extension .fbk. Here, in the figure below the file is flashfxp_2014-12-20.fbk as it has been created on Dec. 20, 2014 and saved on desktop.
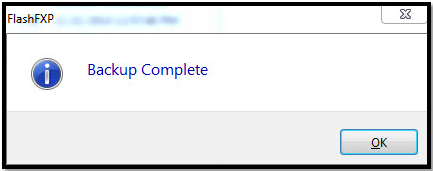
4.As soon as the tab Save is clicked upon backup file gets created and saved at the selected location. For confirmation, a pop prompts up with the message ‘Backup Complete’.
5.Then, copy the backup file to any other new PC. However, it should be noted that the configuration is transferred accurately. This can be done by testing the Flash FXP client.
Finally, in this way the FlashFXP Backup file gets formed and saved on the computer system.
Restore Process of Backup File Explained
The below mentioned steps must be followed to restore the contents from backup file of FlashFXP client.
1.Open FlashFXP client. If it is not installed install it first and then open.
2.As shown in the figure below, from FlashFXP’s main menu click on Tools button, mouse hover to Backup / Restore Configuration tab and then select Restore… tab.
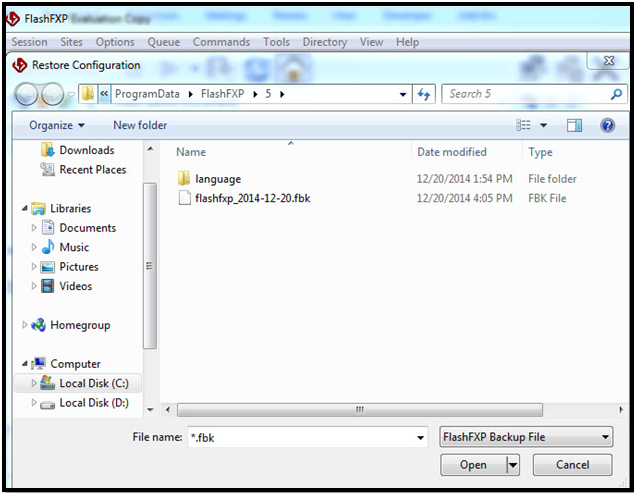
3.On clicking upon the Restore…button, a small Restore Configuration window comes up on the computer screen as the image displayed below shows. Then, from this window the backup file created earlier should be selected to proceed further with the restore process.
4.On selecting the FBK file, a small window called Restore Settings appears on the screen as displayed in the image below. Finally click the Restore tab and restart FlashFXP to restore the contents of the backup file.
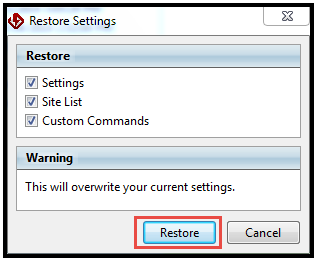
Note – When configuration is restored, the license information is not copied over. Hence, it should be ensured that user has the license key so as to unlock the FlashFXP.